





Slimming down has never been this easy!
13 years ago


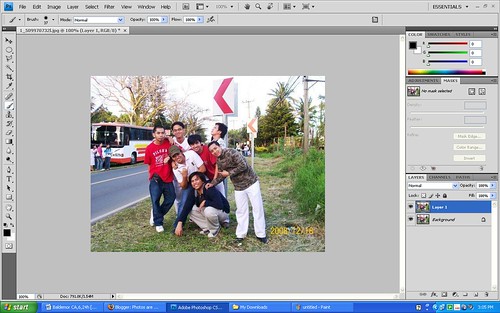
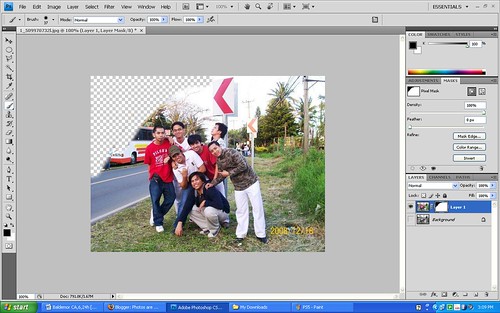
Having a colored subject with a monochrome background is relatively easy to do. This post-process editing would help focus more on your main subject by highlight it. Otherwise, othe reasons to use this kind of editing is for artistic purposes. Here's a step-by-step guide on Photoshop on how to do it (I use Photoshop CS4 Micro):
1. Open up your photoshop.
2. Open the file you want to edit via File>Open
3. Duplicate the Background Layer (Ctrl + J)
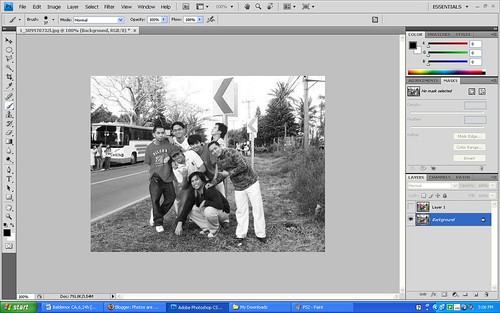
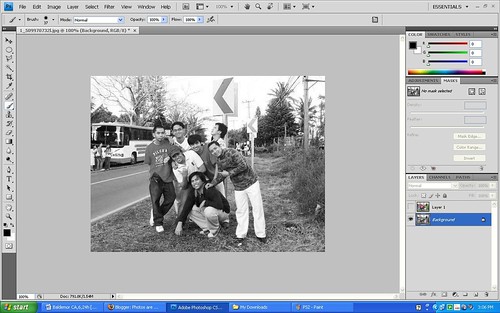
4. Make the Background Layer Monochrome(Ctrl + Shift + U)
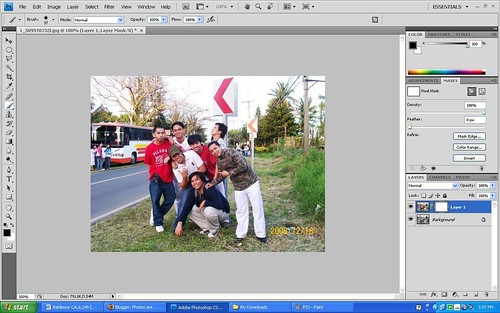
5. Make a mask layer for Layer 1. Select the mask layer.
6. Select the Brush tool and make the foreground color black (This erases the pictures while the white foreground paints). Only erase the areas that you want to be monochrome, in this case, the background. For easier visualizations, tick the eye button beside the Monochrome background layer.
7. After being satisfied with your work. Tick the eye button again beside the Monochrome background layer to reveal your background. After that, you're finished. :) There you go!
Here are some of the pics i've done.
Taking night photos is an exciting endeavor, especially when you are looking for great landscape shots of night lights and cities. Here are some tips on how to take photos at night:
1: Switch your camera to Manual mode by turning the mode dial to ‘M’.
2: Choose the smallest f-number available and a relatively long shutter speed to record the lights. One second is a good starting point and most cameras indicate seconds using double quotes, so look for 1”.
3: Keep your camera very steady. Preferably use a tripod or a Gorillapod. Use the self-timer to avoid wobbling the camera as you press the button.
4: Check your photo. If the lights aren’t bright enough, try a slower shutter speed. If the lights are too bright, try a quicker shutter speed.
5: After taking your photo, remember to set the mode dial back to Auto or Program mode.
Watch out!
Always temporarily switch off any anti-shake or image stabilisation systems when using a tripod. If the camera is perfectly steady these systems can actually introduce wobbling as they attempt to counteract something which isn’t there.
Some cameras will also have difficulty focusing in dark conditions, so if yours is having problems, switch the lens to manual and focus on the lights. If they are distant, focus the lens to infinity.
Another way to maximise available light is to increase your camera’s sensitivity by using a bigger ISO number. Increasing the sensitivity will however reduce your picture quality and may still not give you a quick enough exposure to handhold. So stick to using a tripod and a low ISO number for the best quality.
There you go! Enjoy taking photos! :)
It's summertime already! I bet a lot of you would want to hit the beaches and take photos of great sunrises or sunsets within the distant horizon. However, most of the time, these photos would look faded or washed out when taken in automatic mode. Here are some tips on how to take them:
1: Switch your camera to Program mode by turning the mode dial to ‘P’.
2: Press the exposure compensation button. This is normally labelled with a plus and minus symbol – check your manual for details.
3: Set the compensation to a negative value to deliberately underexpose the shot – a setting of -1 is a good starting point. Some DSLRs require that the compensation button be held as you make this adjustment.
4: If the result is still too bright, choose a bigger number, like -1.5 or even -2. If the result is too dark, choose a smaller number like -0.5 or -0.3.
5: After taking your photo, set the compensation back to zero or all your photos will be darker than normal. Finally if desired, set the mode dial back to Auto.
Expert tip
After discussing about ISO, we'll be discussing about SHUTTER SPEED.
SHUTTER SPEED
Shutter speed is simply a measure of how long the shutter stays open when you take your picture. Automatic cameras can handle this adjustment for you, but there are cases in which you’ll wish to use the shutter priority function of your camera. These are particularly useful when taking pictures of fast moving objects or taking a shot at very low lighting.
In practice, low shutter speeds are used together with high ISO settings in instances wherein there is very low lighting conditions. Low shutter speeds are also used when taking pictures of objects that are moving with a blurred background. They are also useful in depicting "moving" pictures of waterfalls or rivers. The only downside is that an image shot using a low shutter speed is prone to camera shakes. Better use a tripod in these situations.
High shutter speeds are for moving objects also, but with a relatively still background. They can also be used when shooting in places with appropriate lighting. Furthermore, a high shutter speed would help avoid camera shakes when taking a photo.
That is all for SHUTTER SPEED. Next time, I'll be discussing about EXPOSURE COMPENSATION.
After discussing about FOCAL LENGTH, we'll now be discussing ISO. So what exactly is ISO?
ISO
ISO is the measurement of how sensitive a digital camera's sensor is to light. These are represented by ISO numbers (e.g. 50, 100 - 6,400). A higher ISO number would mean a higher sensitivity to light while lowering it would mean the opposite. So how important is the ISO setting?
Higher ISO numbers indicate a higher sensitivity to light, so less time is needed to expose a picture. Most digital cameras let you control the ISO setting to allow the use of higher shutter speeds and/or smaller apertures, according to circumstances.
After discussing about APERTURE and DEPTH OF FIELD, we'll now talk about FOCAL LENGTH. In a previous article, I have discussed about choosing your lens wherein I tackled about focal length.
FOCAL LENGTH
Focal length defines the coverage of the lens, and how much you’ll fit into the photo. Focal length is measured in mm, and the number which closest matches the magnification of the human eye is 50mm. Our eyes have a much bigger field of view, but if you were to look at something in person, and then through a 50mm lens, the actual magnification would be similar. This is why 50mm lenses are known as standard lenses – they’re suited to a wide variety of subjects from landscapes to portraits.
If you want a more wide-angled lens, choose a lens which has smaller focal lengths. If you’re stood in the same position, a 25mm lens will have twice the diagonal field of view of a 50mm, and could therefore be used to squeeze in large buildings, landscapes or even big group shots – ideal when you can’t step back any further. 28mm is the most common wide angle focal length and is ideal for landscape and architecture shots, but you can go much wider still if desired, and anything below 20mm is typically known as an ultra-wide angle lens.
A large focal length is suitable for telephoto shots. There are ideal for getting closer to a subject and also if your after the details. In contrast to wide angle, lenses with longer focal lengths have an inherently smaller depth of field, which means it’s easier to get a blurred background effect – again ideal for portrait, wildlife and sports photography.
Good focal lengths for portraits are typically between 85mm and 135mm – these are often known as short telephotos. Appropriate focal lengths for sports or wildlife are generally much longer – at least 200mm, and ideally 300mm or more. Professional sports and wildlife photographers often use 600mm lenses, or even longer still.
That's about it for FOCAL LENGTH. Next time, we'll be discussing about ISO.
After discussing about the term APERTURE, we'll be tackling about DEPTH OF FIELD.
DEPTH OF FIELD
Depth of field is the term used to specify that area of the photo that is in sharp focus. There's usually a space in front of and behind your subject that's in focus. The aperture can control this. As discussed in this article, wide apertures (f2, f2.8) let in a lot of light but have a narrow depth of field. In other words, the area of sharpness is very narrow from front to back. In contrast, if you use a very small opening (aperture) such as f22, you'll find that the area of depth of sharpness is much greater. You may be able to get an entire length of a bug in the photo and have it sharp from front to rear. But in a case such as this, you're allowing very little light into the film, so you must use a slower shutter speed to allow enough light to expose properly.
In practice, for instance, if you were taking a photo of a statue in a lower aperture setting (e.g. f2, f2.8), the front of the statue may be sharp but the rear of it in the photo may be fuzzy. Similarly, when taking photos of animals in a low aperture setting, the front of the long face of an animal might be in sharp focus, while the back part would be difficult to make out. Because you're allowing plenty of light in through the wide opening, you can take the shot at fast speeds so you won't overexpose. What this implies is that there is a significant relationship between aperture, shutter speed and the depth of sharpness of a certain picture. The lower the aperture setting, the higher the shutter speed, and less of the picture are in sharp focus. In contrast, a higher aperture requires more light to come in, thus resulting to a slower shutter speed but a greater deal of sharpness throughout the picture.
That's all for DEPTH OF FIELD, next time, we'll tackle on LENS FOCAL LENGTH.
Terms such as aperture, depth of field, shutter speed, shutter priority, etc are some of the terms that photographers commonly use. In this article, we will try to understand the basic terms used in photography and how we can correlate these in practice. Let's start the first topic of this series:
Aperture
We all know that a camera makes use of a lens which serves just like the lens of your eye. Like the eye, any amount of light entering a camera must be regulated by a certain device called the APERTURE. Since photography is “painting with light,” this principle is very important. The aperture widens and narrows as you turn the dial in your camera. This is represented by the "f" number (f1.7, f2, f2.8 up to f32) in your camera. These are called the "f-stops". The “f” comes from the word "focal." The f-stop is the ratio of the focal length of the lens to the diameter of the opening in the lens. The smaller numbers (f1.7, f2, etc.) are wider apertures that allow more light to pass through to the film. The larger numbers (f16, f22, f32 etc.) allow less light to pass through to the film in the same length of time.
In practice, smaller aperture ratios may be used when taking photos of the main subject in focus with a nice blurred background. In contrast, a high aperture ratio would tend to focus more details in the picture such as your background and foreground. As the f-stop increases in number (f16, f22, f32 etc), the iris gets smaller, thus, having less light passing through the lens but focusing more of your picture. The opposite happens when the f-stop decreases. Similarly, you can use aperture manipulation when shooting in low light such as night photography. However, that would be another topic that we'll be discussing in another time.
That's all for APERTURE. More about photography terms: DEPTH OF FIELD. Click here.
Here are some tutorials that I have made based purely from research and, as much as possible, from experience as well.
How to..
The good thing about having a DSLR is the ability to change lenses depending on your photographic style or simply by what you shoot. You can change from a macro shot to a telephoto shot with a slight change in your lens. So how do you choose which lens to use at any given time? In this guide I will show you everything there is to know about this topic.
Now let's start, first of all, when choosing your lens, you should determine which kind of photos are you trying to take. Would it be an action shot? Or maybe landscapes of distant views? Or maybe you are into details of a tiny flower? Different kinds of photo styles would mean a different lens, right? Wrong. One lens could suit all your needs. It is just a matter of picking the right one. Let's take a closer look at this.
A DSLR lens are named based on their product brand (Nikkor for Nikon, Canon for Canon, etc.), focal length (50mm-300mm), and if the lens has an anti-shake capability (Vibration Reduction [VR] for Nikon, Image Stabilization [IS] for Canon, Optical Stabilization [OS] for Sigma). Lets discuss each one:
Focal Length
This is the most important aspect of your lens. This defines the coverage of the lens, and how much you’ll fit into the photo. Focal length is measured in mm, and the number which closest matches the magnification of the human eye is 50mm. Our eyes have a much bigger field of view, but if you were to look at something in person, and then through a 50mm lens, the actual magnification would be similar. This is why 50mm lenses are known as standard lenses – they’re suited to a wide variety of subjects from landscapes to portraits.
If you want a more wide-angled lens, choose a lens which has smaller focal lengths. If you’re stood in the same position, a 25mm lens will have twice the diagonal field of view of a 50mm, and could therefore be used to squeeze in large buildings, landscapes or even big group shots – ideal when you can’t step back any further. 28mm is the most common wide angle focal length and is ideal for landscape and architecture shots, but you can go much wider still if desired, and anything below 20mm is typically known as an ultra-wide angle lens.
A large focal length is suitable for telephoto shots. There are ideal for getting closer to a subject and also if your after the details. In contrast to wide angle, lenses with longer focal lengths have an inherently smaller depth of field, which means it’s easier to get a blurred background effect – again ideal for portrait, wildlife and sports photography.
Good focal lengths for portraits are typically between 85mm and 135mm – these are often known as short telephotos. Appropriate focal lengths for sports or wildlife are generally much longer – at least 200mm, and ideally 300mm or more. Professional sports and wildlife photographers often use 600mm lenses, or even longer still.
Anti-shake Mechanism
Some lenses feature anti-shake facilities which allow you to typically handhold at shutter speeds three to four times slower than normal. This won’t stop a moving subject from blurring, but it can greatly reduce the effect of camera shake.
Lens-based anti-shake systems all work in the same way by detecting wobbles and adjusting a special optical element inside the lens to counteract them in real-time. The benefit of fitting it inside the lens is you’ll see the stabilising effect through the viewfinder, which can be very reassuring, especially at longer focal lengths.
Some anti-shake lenses offer a panning mode which ignores horizontal motion and only stabilises vertically. Some of the latest models can even detect this motion and switch their mode accordingly. Older, or more basic anti-shake lenses won’t work with panning though and the feature should be temporarily switched off. Likewise if you’re using a tripod, you should switch the stabilisation off or the system could actually introduce wobbling.Some lenses feature built-in focusing motors, whereas others rely on a motor that’s built into the DSLR. In most situations you won’t need to worry too much about this, but there are a couple of important exceptions.
To save weight and money, Nikon removed the internal focusing motor from its budget D40 and D40x DSLRs, so they will only auto-focus with newer lenses that have their own focusing motors. In Nikon’s own range, you’ll need a lens with AF-S to auto-focus with the D40 or D40x. If it doesn’t have AF-S then you’ll be manually focusing with a D40 or D40x. If you’re buying a Sigma or Tamron lens, look out for models specifically compatible with the D40 and D40x.All of Canon’s current lenses have built-in focusing motors, but again some are better than others. Canon lenses with USM in their title have special ultrasonic motors which are quicker and much quieter than non-USM models. So if you’re buying a Canon lens and want quick and quiet focusing, buy a model with USM.
Nikon’s equivalent technology is called Silent Wave Motor, or SWM for short. This is the S in AF-S, so for quick and quiet focusing on a Nikkor lens, choose an AF-S model. The equivalent technology from Sony, Pentax, Olympus and Sigma is called SSM, SDM, SWD and HSM respectively; note to fully exploit SDM (DA*) lenses from Pentax though, you’ll need a compatible body like the K10D.


