


Colored Subject with Monochrome Background
Having a colored subject with a monochrome background is relatively easy to do. This post-process editing would help focus more on your main subject by highlight it. Otherwise, othe reasons to use this kind of editing is for artistic purposes. Here's a step-by-step guide on Photoshop on how to do it (I use Photoshop CS4 Micro):
1. Open up your photoshop.
2. Open the file you want to edit via File>Open
3. Duplicate the Background Layer (Ctrl + J)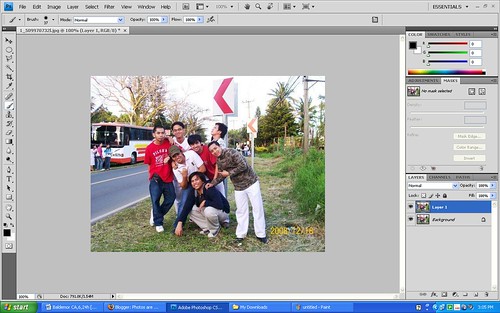
4. Make the Background Layer Monochrome(Ctrl + Shift + U)
5. Make a mask layer for Layer 1. Select the mask layer.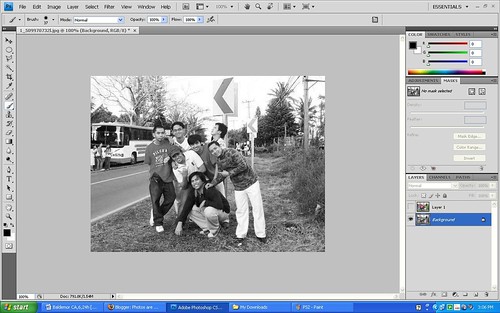
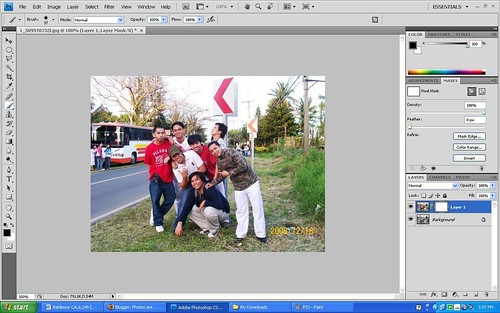
6. Select the Brush tool and make the foreground color black (This erases the pictures while the white foreground paints). Only erase the areas that you want to be monochrome, in this case, the background. For easier visualizations, tick the eye button beside the Monochrome background layer.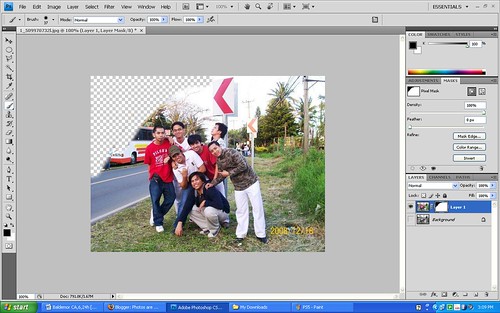
7. After being satisfied with your work. Tick the eye button again beside the Monochrome background layer to reveal your background. After that, you're finished. :) There you go!
Here are some of the pics i've done.


Taking Photos at Night
Taking night photos is an exciting endeavor, especially when you are looking for great landscape shots of night lights and cities. Here are some tips on how to take photos at night:
1: Switch your camera to Manual mode by turning the mode dial to ‘M’.
2: Choose the smallest f-number available and a relatively long shutter speed to record the lights. One second is a good starting point and most cameras indicate seconds using double quotes, so look for 1”.
3: Keep your camera very steady. Preferably use a tripod or a Gorillapod. Use the self-timer to avoid wobbling the camera as you press the button.
4: Check your photo. If the lights aren’t bright enough, try a slower shutter speed. If the lights are too bright, try a quicker shutter speed.
5: After taking your photo, remember to set the mode dial back to Auto or Program mode.
Watch out!
Always temporarily switch off any anti-shake or image stabilisation systems when using a tripod. If the camera is perfectly steady these systems can actually introduce wobbling as they attempt to counteract something which isn’t there.
Some cameras will also have difficulty focusing in dark conditions, so if yours is having problems, switch the lens to manual and focus on the lights. If they are distant, focus the lens to infinity.
Another way to maximise available light is to increase your camera’s sensitivity by using a bigger ISO number. Increasing the sensitivity will however reduce your picture quality and may still not give you a quick enough exposure to handhold. So stick to using a tripod and a low ISO number for the best quality.
There you go! Enjoy taking photos! :)
How to Take Sunsets/Sunrise Photos
It's summertime already! I bet a lot of you would want to hit the beaches and take photos of great sunrises or sunsets within the distant horizon. However, most of the time, these photos would look faded or washed out when taken in automatic mode. Here are some tips on how to take them:
1: Switch your camera to Program mode by turning the mode dial to ‘P’.
2: Press the exposure compensation button. This is normally labelled with a plus and minus symbol – check your manual for details.
3: Set the compensation to a negative value to deliberately underexpose the shot – a setting of -1 is a good starting point. Some DSLRs require that the compensation button be held as you make this adjustment.
4: If the result is still too bright, choose a bigger number, like -1.5 or even -2. If the result is too dark, choose a smaller number like -0.5 or -0.3.
5: After taking your photo, set the compensation back to zero or all your photos will be darker than normal. Finally if desired, set the mode dial back to Auto.
Expert tip
There you go! :) Take those sunsets like there's no tomorrow. :) Good luck on your vacation!
Manila Zoo 4/3/09
Last friday, Chi and I decided the take a tour at the Manila Zoo. It was just for fun. Tickets cost P40 ($0.80) for non-Manilans and P20 ($0.40) for Manilans. Of course being students of PLM, we got the P20 worth tickets. :) Not that many animals to see compared to Avilon Zoo, but it is still enjoyable. :) Here are some pics during the tour. Enjoy. These were taken by my Sony Ericsson S700i.
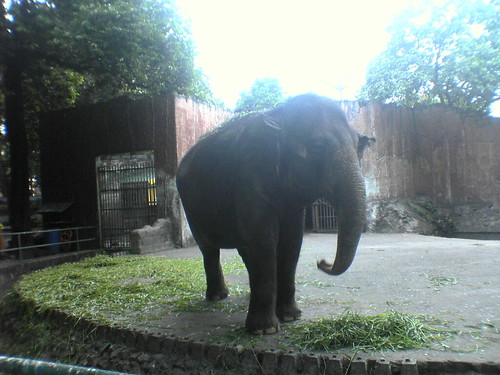 Dumbo
Dumbo Me and Chi
 Me and Chi with a Hippo at the back
 Hisss!!
 Iguana
 TMNTs
TMNTs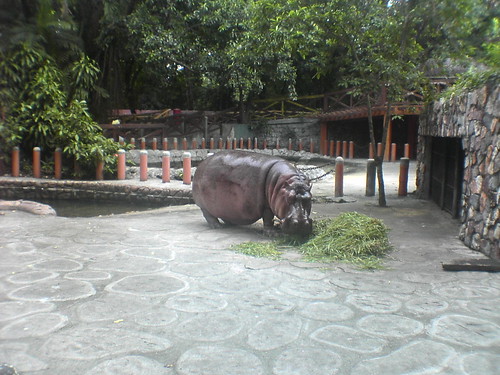 Love this pic of the Hippo! LOL! So fat and chubby!
 Enjoying it!
 Reminds me of the Croc Hunter
 Now this reminds me of a classic cartoon movie
 Now this reminds me of Madagascar
 A magnificent bird!
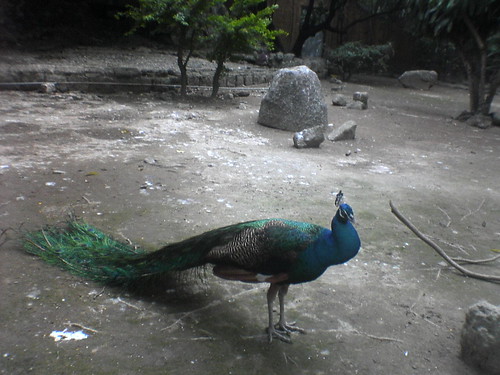 Very vibrant colors!
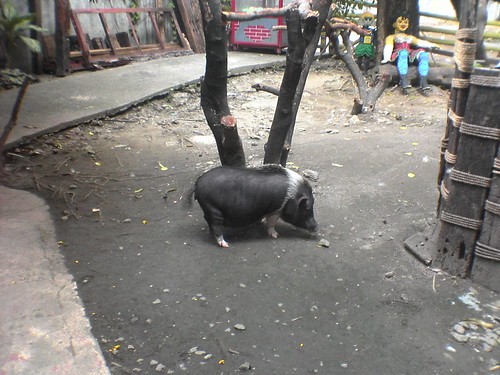 Our favorite animal in the zoo. SO chubby!!!
The Nikon D60
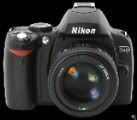
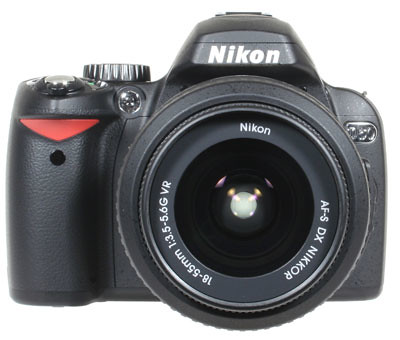 Like the Nikon D40 and D40x, the Nikon D60 is an entry-level DSLR. It features a 10.2 megapixel CCD sensor and a 2.5 in screen along with the same body and controls as the Nikon D40x. So what is new with the Nikon D60?
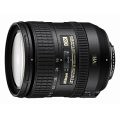
The great thing about buying the Nikon D60 is that you can purchase it with a Nikkor DX 18-55mm VR lens which features vibration reduction facilities. Also new to the D60 are eye sensors which switch the screen off when you're looking through the viewfinder, a stop-motion recording mode, Active D-Lighting and an anti-dust system. We'll talk about them one by one.
Unlike the Nikon D40x, the Nikon D60 has eye sensors which detect when you are looking through the viewfinder. This will close or open the LCD screen in your camera which will save you battery life. Furthermore, the LCD screen can now rotate as you rotate your camera to shoot portraits or landscape photos.
The stop-motion feature of the D60 allows you to make clips from your images. You can adjust the frame rate and the resolution of the movie. This feature is somewhat limited in the sense that you can only make a 100-image movie. This severely limits what you can do with the D60 when it comes to making clips (it IS a camera and not a camcorder).
Active D-lighting is another new feature for this entry-level camera which can be used to preserve details of your images (e.g. shadows, washed out images, etc). It is a feature borrowed from Nikon's higher end DSLRs. Its pretty useful for beginners and advanced users alike.
Lastly is the anti-dust facility. There are two ways in which this camera combats dust: it can vibrate the filter in front of the sensor in order to shake of the dust and a brand new airflow system. The airflow system exploits the air pressure within the DSLR to flush the dust out through the air ducts within the lens mount. Pretty useful eh?
Looking for cheap Nikon D60 prices? Its in here. Or you can buy one through Amazon.com.
Other features (from NikonUSA.com) of the Nikon D60 are:
- Extraordinary 10.2-Megapixel DX-format Nikon Picture Quality: Nikon's high-performance, 10.2-megapixel DX-format CCD imaging sensor and exclusive EXPEED image processing concept provide added cropping freedom and the ability to make larger prints.
- Includes AF-S DX NIKKOR 18-55mm f/3.5-5.6G VR (Vibration Reduction) Image Stabilization Lens: NIKKOR lenses are famous for breathtaking sharpness and faithful color. With Nikon's fast, accurate autofocus and Vibration Reduction (VR) image stabilization technology built in, pictures are even sharper, free from blur caused by camera shake when shooting hand-held.
- Fast Startup and Split-Second Shutter Response: With fast startup and split-second shutter response, the D60 eliminates the frustration of shutter delay, capturing moments that other cameras miss.
- Shoot Continuously at up to 3 Frames per Second: Capture sports action, precious moments and fleeting expressions at up to 3 frames per second, for as many as 100 consecutive JPEG images.
- Active Dust Reduction System with Airflow Control: Nikon's Active Dust Reduction System activates automatically, along with Airflow Control technology to reduce the amount of dust that reaches the sensor.
- Easy Operation with Intuitive Controls: Intuitive controls and an onboard HELP Menu System with Assist Images make the D60 truly easy to use, enabling everyone to capture beautiful memories perfectly.
- Nikon's EXPEED Image Processing Concept: Nikon's original digital image processing concept, EXPEED, comprehensively optimizes pictures, shot after shot.
- 8 Digital-Vari Program Automatic Shooting Modes: Eight Digital Vari-Program Modes include: Auto, Auto Flash-OFF, Portrait, Landscape, Child, Sports, Close Up and Night Portrait; each of which adjusts automatically for optimal results for everyday shooting situations. Each mode considers lighting conditions and possibilities, aperture, shutter speed, white balance, hue, tone, sharpening and more to make creative photography as simple as rotating the mode dial.
- Nikon's Smallest Digital SLR Ever! Beautifully styled, the D60 makes high-performance digital SLR photography easier and more convenient than ever. You'll be amazed at the power packed into a camera that weighs just over 16 ounces.
- 2.5-Inch, 230,000-Dot Color LCD Monitor with 170-Degree Wide-Angle Viewing: Playback images are easy to see and function menus are easier to use with a larger and brighter color LCD monitor. The large 2.5-inch LCD monitor enables image preview at up to 19 times magnification and has large type fonts with easy-to-view menus. Auto rotating LCD display provides automatic horizontal and vertical graphic display orientation.
- Advanced HELP Menu System with Assist Images: The D60's Assist Images help you select the appropriate settings for many camera features by showing an example image typical of that setting, as well as an advanced HELP Menu for the current item selected. The D60's Question Mark icon (?) indicates that help is available for the currently selected item; just press the HELP button beside the LCD monitor to see a context-sensitive HELP page.
- Nikon 3D Color Matrix Metering II: The D60's 3D Color Matrix Metering II evaluates each scene for brightness, color, contrast, size and position of shadows and highlights, selected focus area and camera-to-subject distance, comparing that information against an onboard database of more than 30,000 actual photographic scenes. The result delivers instantly and precisely determined exposures for each scene, even in challenging lighting conditions.
- Image Optimization Options: The D60's Optimize Image setting lets photographers adjust color, contrast and sharpening, as well as other image settings, according to the type of scene or output desired. Settings include: Normal, Softer, Vivid, More Vivid, Portrait, Custom and Black and White, each of which are automatically adjusted based on sophisticated Nikon algorithms or user-selected settings for optimum results.
- Built-in Speedlight with i-TTL Automatic Flash Control: Nikon's innovative i-TTL flash control evaluates flash exposure with incredible precision to achieve better automatic flash balance and deliver outstanding results. The built-in Speedlight is always ready to bring beautiful exposures to darkened conditions, as well as add sparkle for fill flash in outdoor situations for enhanced twilight shots or an added impact to daylight images. In low-light or back-light situations, added illumination from the built-in Speedlight can make the difference between an average snapshot and a dazzling picture.
- Fast, Accurate 3-Area Autofocus: The D60's advanced 3-Area AF system and the refined algorithms inherited from more advanced Nikon digital SLR cameras deliver fast, efficient and precise Autofocus. AF refinements deliver greater precision with fast, more consistent subject acquisition and improved focus tracking for consistently sharper pictures.
- In-Camera Image Editing and Enhanced Retouch Menu: Highly versatile in-camera editing features through the Retouch Menu include Nikon D-Lighting, Red-Eye Correction, Image Trim, Image Overlay, Monochrome (Black and White, Sepia and Cyanotype) along with Skylight, Warm Tone and Color Balance filter effects. New effects and controls include Quick Retouch, NEF (RAW) Processing, Cross Star and Color Intensifier filters. This provides greater creative freedom without the need for a computer for those who prefer to send pictures directly to a printer.
Stop motion video: Creates a stop-motion animation from a sequence of images for added creative fun to your pictures.
Up to 500 Images per Battery Charge: The supplied EN-EL9 rechargeable battery will allow for shooting up to 500 images per charge based on CIPA battery testing standards.
- Supplied accessories (may differ by country or area): EN-EL9 Rechargeable Li-ion Battery, MH-23 Quick Charger, UC-E4 USB Cable, DK-20 Rubber Eyecup, AN-DC1 Camera Strap, BF-1A Body Cap , DK-5 Eyepiece Cap, BS-1 Accessory Shoe Cover, Software Suite CD-ROM
Deciphering Camera Terms Series: Shutter Speed
After discussing about ISO, we'll be discussing about SHUTTER SPEED.
SHUTTER SPEED
Shutter speed is simply a measure of how long the shutter stays open when you take your picture. Automatic cameras can handle this adjustment for you, but there are cases in which you’ll wish to use the shutter priority function of your camera. These are particularly useful when taking pictures of fast moving objects or taking a shot at very low lighting.
In practice, low shutter speeds are used together with high ISO settings in instances wherein there is very low lighting conditions. Low shutter speeds are also used when taking pictures of objects that are moving with a blurred background. They are also useful in depicting "moving" pictures of waterfalls or rivers. The only downside is that an image shot using a low shutter speed is prone to camera shakes. Better use a tripod in these situations.
High shutter speeds are for moving objects also, but with a relatively still background. They can also be used when shooting in places with appropriate lighting. Furthermore, a high shutter speed would help avoid camera shakes when taking a photo.
That is all for SHUTTER SPEED. Next time, I'll be discussing about EXPOSURE COMPENSATION.
Deciphering Camera Terms Series: ISO
After discussing about FOCAL LENGTH, we'll now be discussing ISO. So what exactly is ISO?
ISO
ISO is the measurement of how sensitive a digital camera's sensor is to light. These are represented by ISO numbers (e.g. 50, 100 - 6,400). A higher ISO number would mean a higher sensitivity to light while lowering it would mean the opposite. So how important is the ISO setting?
Higher ISO numbers indicate a higher sensitivity to light, so less time is needed to expose a picture. Most digital cameras let you control the ISO setting to allow the use of higher shutter speeds and/or smaller apertures, according to circumstances.
In practice, high ISO settings can be used when you have plenty of light and you need a fast shutter speed to stop action. The fast shutter speed can help you capture a sharp image even when you don’t have a tripod. The faster that shutter clicks, the less time you have to move the lens and blur the picture. You would have an ISO of 200 and above to achieve this.
In contrast, inside shots without flash will need a lower ISO setting. Perhaps you want to catch a moody shot of people sitting together in candlelight at a dinner. That setting doesn’t produce enough light to register on the sensor unless you require the subjects to sit there for a few minutes. Even then, the saturation of the film can break down (meaning the colors will look weird), so you need to use a low ISO setting with a longer shutter speed, one that will register an image with very little light(perhaps an ISO of 50).
That is all for ISO, next time we'll be tackling about SHUTTER SPEED.
Deciphering Camera Terms Series: Focal Length
After discussing about APERTURE and DEPTH OF FIELD, we'll now talk about FOCAL LENGTH. In a previous article, I have discussed about choosing your lens wherein I tackled about focal length.
FOCAL LENGTH
Focal length defines the coverage of the lens, and how much you’ll fit into the photo. Focal length is measured in mm, and the number which closest matches the magnification of the human eye is 50mm. Our eyes have a much bigger field of view, but if you were to look at something in person, and then through a 50mm lens, the actual magnification would be similar. This is why 50mm lenses are known as standard lenses – they’re suited to a wide variety of subjects from landscapes to portraits.
If you want a more wide-angled lens, choose a lens which has smaller focal lengths. If you’re stood in the same position, a 25mm lens will have twice the diagonal field of view of a 50mm, and could therefore be used to squeeze in large buildings, landscapes or even big group shots – ideal when you can’t step back any further. 28mm is the most common wide angle focal length and is ideal for landscape and architecture shots, but you can go much wider still if desired, and anything below 20mm is typically known as an ultra-wide angle lens.
A large focal length is suitable for telephoto shots. There are ideal for getting closer to a subject and also if your after the details. In contrast to wide angle, lenses with longer focal lengths have an inherently smaller depth of field, which means it’s easier to get a blurred background effect – again ideal for portrait, wildlife and sports photography.
Good focal lengths for portraits are typically between 85mm and 135mm – these are often known as short telephotos. Appropriate focal lengths for sports or wildlife are generally much longer – at least 200mm, and ideally 300mm or more. Professional sports and wildlife photographers often use 600mm lenses, or even longer still.
That's about it for FOCAL LENGTH. Next time, we'll be discussing about ISO.
Hidalgo Shops Price Listings as of 4/30/09
Every week or so, I will be updating on Hidalgo, Quiapo shop prices and their corresponding dollar value. For now, I will only be mentioning Nikon and Canon Camera prices. Please comment on other items you want to inquire about and i'll see what I can do.
CAMERAS and KIT BUNDLES
Mayer's
Nikon D40 Kit Bundle (4gb + bag) = P19,800 ($396)
Nikon D60 with free 4GB Transcend SD card plus bag = P25,000 ($500)
Nikon D90 Kit + 4gb mem card = P53,500 ($1,070)
Nikon D90 Body = P39,500 ($790)
Canon 1000d kit = P28,000 ($560)
Canon 450d kit = P35,000 ($700)
Henry's
Nikon D90 body = P43,000 ($860)
Nikon D60 Kit = P27,000 ($540)
Nikon D300 Kit = P62,000 ($1240)
Nikon D700 Kit = P105,000 ($2,100)
Canon 450d kit = P35,000 ($700)
Canon 450D with 18-200 Kit lens = P58,000 ($1,160)
Watson
Nikon D60 Kit = P26,000 ($520)
LENSES
Nikkor AF Micro 60mm f/2.8D = P16,500 ($330)
Nikkor AF 85mm f/1.8D = P16,500 ($330)
Nikkor AF-S 105mm VR Micro = P38,500 ($770)
Nikkor AF-S 16-85mm f/3.5-5.6G ED VR = P34,000 ($680)
Nikkor AF 80-200 f/2.8D ED = P46,000 ($920)
Nikkor AF-S DX VR 55-200mm f/4-5.6G ED = P11,000 ($220)
Nikkor AF-S DX 35mm f/1.8G = P15,000 ($300)
Nikkor AF-S VR 70-200mm f/2.8G IF-ED = P82,000 ($1,640)
Nikkor AF-S 24-70mm f/2.8G ED = P84,000 ($1,680)
Nikkor AF-S 14-24mm f/2.8G = P83,000 ($1640)
Nikkor AF-S VR 70-300mm f/4.5-5.6G IF-ED = P28,500 ($570)
Nikkor AF-S VR 70-300mm f/3.5G = P23,000 ($460)
Canon 70-200mm f2.8 Non IS = P57,000 ($1,140)
Canon EF-S 17-55 f/2.8 IS = P45,000 ($900)
Tamron 28-75mm 2.8 Canon mount = P17,000 ($340)
Sigma 70-200mm f/2.8 EX DX HSM = P35,000 ($700)
ACCESORIES
Suntek 77 UV filter = P550 ($11)
These are all for now.
Note: If you want to order in these shops, you can order through me for a minimal price (usually $10-$20). Shipping costs will also be shouldered by the buyer. To place an order or for inquiries, mail me @ 200715july@gmail.com.
*Prices will be updated weekly. Check back often.
Deciphering Camera Terms Series: Depth of Field
After discussing about the term APERTURE, we'll be tackling about DEPTH OF FIELD.
DEPTH OF FIELD
Depth of field is the term used to specify that area of the photo that is in sharp focus. There's usually a space in front of and behind your subject that's in focus. The aperture can control this. As discussed in this article, wide apertures (f2, f2.8) let in a lot of light but have a narrow depth of field. In other words, the area of sharpness is very narrow from front to back. In contrast, if you use a very small opening (aperture) such as f22, you'll find that the area of depth of sharpness is much greater. You may be able to get an entire length of a bug in the photo and have it sharp from front to rear. But in a case such as this, you're allowing very little light into the film, so you must use a slower shutter speed to allow enough light to expose properly.
In practice, for instance, if you were taking a photo of a statue in a lower aperture setting (e.g. f2, f2.8), the front of the statue may be sharp but the rear of it in the photo may be fuzzy. Similarly, when taking photos of animals in a low aperture setting, the front of the long face of an animal might be in sharp focus, while the back part would be difficult to make out. Because you're allowing plenty of light in through the wide opening, you can take the shot at fast speeds so you won't overexpose. What this implies is that there is a significant relationship between aperture, shutter speed and the depth of sharpness of a certain picture. The lower the aperture setting, the higher the shutter speed, and less of the picture are in sharp focus. In contrast, a higher aperture requires more light to come in, thus resulting to a slower shutter speed but a greater deal of sharpness throughout the picture.
That's all for DEPTH OF FIELD, next time, we'll tackle on LENS FOCAL LENGTH.
Deciphering Camera Terms Series: Aperture
Terms such as aperture, depth of field, shutter speed, shutter priority, etc are some of the terms that photographers commonly use. In this article, we will try to understand the basic terms used in photography and how we can correlate these in practice. Let's start the first topic of this series:
Aperture
We all know that a camera makes use of a lens which serves just like the lens of your eye. Like the eye, any amount of light entering a camera must be regulated by a certain device called the APERTURE. Since photography is “painting with light,” this principle is very important. The aperture widens and narrows as you turn the dial in your camera. This is represented by the "f" number (f1.7, f2, f2.8 up to f32) in your camera. These are called the "f-stops". The “f” comes from the word "focal." The f-stop is the ratio of the focal length of the lens to the diameter of the opening in the lens. The smaller numbers (f1.7, f2, etc.) are wider apertures that allow more light to pass through to the film. The larger numbers (f16, f22, f32 etc.) allow less light to pass through to the film in the same length of time.
In practice, smaller aperture ratios may be used when taking photos of the main subject in focus with a nice blurred background. In contrast, a high aperture ratio would tend to focus more details in the picture such as your background and foreground. As the f-stop increases in number (f16, f22, f32 etc), the iris gets smaller, thus, having less light passing through the lens but focusing more of your picture. The opposite happens when the f-stop decreases. Similarly, you can use aperture manipulation when shooting in low light such as night photography. However, that would be another topic that we'll be discussing in another time.
That's all for APERTURE. More about photography terms: DEPTH OF FIELD. Click here.
Choosing your Tripod
Earlier, I have discussed about Choosing your Lens on different styles of photography. Now, I will be tackling on choosing your tripod.
Tripods are used to sharpen your images and eliminate any shakes that could distort or compromise your image's sharpness. This is particularly useful when using longer exposures or when doing telephoto shots. On choosing your tripod, you must consider three things: the tripod's weight, height and the ease of use. Let's discuss each one.
Tripod Weight
A heavier tripod provides more stability than the lighter ones. Pretty much self-explanatory. A good rule is to purchase the heaviest tripod you are willing to carry the typical distance that you photograph away from your vehicle or house. The downside is that you'll restrict yourself by the distance you are willing to carry the tripod, hence, a limited choice of angles.
Tripod Height
When purchasing a tripod, an important aspect to look for is the height. The combination of the tripod, tripod head, and camera should allow you the viewfinder to beat your eye level when you are standing straight up. If the tripod is too short, you may experience some back pains from constantly bending over to photograph. Also, look for tripods in which their height can be adjusted easily so as to keep your shots as unique as possible.
Ease of Use
The most important thing is that you are comfortable using your tripod. Choose one that suits your style. Various tripods are available ranging from the classic standard tripod to your gorillapods, which would be useful in any opportunity.
Things to Remember:
When purchasing a tripod, do a test drive. Bring your camera gear to the store and try the various tripods discussed in this article. The ergonomics of the tripod are also important. Some tripods feel better than others. For example, some companies use levers to adjust the legs; other companies use knobs. Find out which one works better for you. Your personal choice is the determining factor in the decisions you will need to make when purchasing a tripod.
Tutorials Page
Here are some tutorials that I have made based purely from research and, as much as possible, from experience as well.
How to..
- Choose a Lens
- Choose a Tripod
- Deciphering Camera Terms Series: Aperture
- Deciphering Camera Terms Series: Depth of Field
- Deciphering Camera Terms Series: Focal Length
- Deciphering Camera Terms Series: ISO
- Deciphering Camera Terms Series: Shutter Speed
- Take photos of sunrise/sunsets
- Take night photos
More tutorials to come...
How to Choose a Lens
The good thing about having a DSLR is the ability to change lenses depending on your photographic style or simply by what you shoot. You can change from a macro shot to a telephoto shot with a slight change in your lens. So how do you choose which lens to use at any given time? In this guide I will show you everything there is to know about this topic.
Now let's start, first of all, when choosing your lens, you should determine which kind of photos are you trying to take. Would it be an action shot? Or maybe landscapes of distant views? Or maybe you are into details of a tiny flower? Different kinds of photo styles would mean a different lens, right? Wrong. One lens could suit all your needs. It is just a matter of picking the right one. Let's take a closer look at this.
A DSLR lens are named based on their product brand (Nikkor for Nikon, Canon for Canon, etc.), focal length (50mm-300mm), and if the lens has an anti-shake capability (Vibration Reduction [VR] for Nikon, Image Stabilization [IS] for Canon, Optical Stabilization [OS] for Sigma). Lets discuss each one:
Focal Length
This is the most important aspect of your lens. This defines the coverage of the lens, and how much you’ll fit into the photo. Focal length is measured in mm, and the number which closest matches the magnification of the human eye is 50mm. Our eyes have a much bigger field of view, but if you were to look at something in person, and then through a 50mm lens, the actual magnification would be similar. This is why 50mm lenses are known as standard lenses – they’re suited to a wide variety of subjects from landscapes to portraits.
If you want a more wide-angled lens, choose a lens which has smaller focal lengths. If you’re stood in the same position, a 25mm lens will have twice the diagonal field of view of a 50mm, and could therefore be used to squeeze in large buildings, landscapes or even big group shots – ideal when you can’t step back any further. 28mm is the most common wide angle focal length and is ideal for landscape and architecture shots, but you can go much wider still if desired, and anything below 20mm is typically known as an ultra-wide angle lens.
A large focal length is suitable for telephoto shots. There are ideal for getting closer to a subject and also if your after the details. In contrast to wide angle, lenses with longer focal lengths have an inherently smaller depth of field, which means it’s easier to get a blurred background effect – again ideal for portrait, wildlife and sports photography.
Good focal lengths for portraits are typically between 85mm and 135mm – these are often known as short telephotos. Appropriate focal lengths for sports or wildlife are generally much longer – at least 200mm, and ideally 300mm or more. Professional sports and wildlife photographers often use 600mm lenses, or even longer still.
Anti-shake Mechanism
Some lenses feature anti-shake facilities which allow you to typically handhold at shutter speeds three to four times slower than normal. This won’t stop a moving subject from blurring, but it can greatly reduce the effect of camera shake.
Lens-based anti-shake systems all work in the same way by detecting wobbles and adjusting a special optical element inside the lens to counteract them in real-time. The benefit of fitting it inside the lens is you’ll see the stabilising effect through the viewfinder, which can be very reassuring, especially at longer focal lengths.
Some anti-shake lenses offer a panning mode which ignores horizontal motion and only stabilises vertically. Some of the latest models can even detect this motion and switch their mode accordingly. Older, or more basic anti-shake lenses won’t work with panning though and the feature should be temporarily switched off. Likewise if you’re using a tripod, you should switch the stabilisation off or the system could actually introduce wobbling.Focusing
Focusing is obviously a crucial aspect of any lens, and some models do it better than others. While the auto-focusing decisions are normally made within the DSLR, the actual focusing itself is performed by the lens, and there’s several things to look out for.
Some lenses feature built-in focusing motors, whereas others rely on a motor that’s built into the DSLR. In most situations you won’t need to worry too much about this, but there are a couple of important exceptions.
To save weight and money, Nikon removed the internal focusing motor from its budget D40 and D40x DSLRs, so they will only auto-focus with newer lenses that have their own focusing motors. In Nikon’s own range, you’ll need a lens with AF-S to auto-focus with the D40 or D40x. If it doesn’t have AF-S then you’ll be manually focusing with a D40 or D40x. If you’re buying a Sigma or Tamron lens, look out for models specifically compatible with the D40 and D40x.All of Canon’s current lenses have built-in focusing motors, but again some are better than others. Canon lenses with USM in their title have special ultrasonic motors which are quicker and much quieter than non-USM models. So if you’re buying a Canon lens and want quick and quiet focusing, buy a model with USM.
Nikon’s equivalent technology is called Silent Wave Motor, or SWM for short. This is the S in AF-S, so for quick and quiet focusing on a Nikkor lens, choose an AF-S model. The equivalent technology from Sony, Pentax, Olympus and Sigma is called SSM, SDM, SWD and HSM respectively; note to fully exploit SDM (DA*) lenses from Pentax though, you’ll need a compatible body like the K10D.


